Free Domain and Web Hosting
Webhosting doesn't have to be expensive. Actually, it doesn't have to cost a thing
It's the third semester in school, and that means, it's project time.
Guys are busy working on their projects, and I figured I might write a tutorial to show them how they can host their projects online, using a custom domain, for free.
Because, why use a localhost during the presentation when you can just ask the panel to open up the site and interact with the project?
Okay, let's get right into it.
Getting a Free Domain
When it comes to free domains, you don't have much of a choice concerning the extension you get.
So, unless a registrar (such as Namecheap who I really recommend) is running a promotion, do not expect to get a .com, .org, .net etc domain for free. Even if they are running a promotion, you'll still have to pay some amount for them.
But, since we are not focusing on a production application here, we don't need those TLDs (Top Level Domains).
For this tutorial, we will set up a .tk domain, which we can get for free.
Dot.Tk
To get a .tk domain, open your browser and go to dot.tk.
This site's interface is pretty damn easy to navigate. Just type your desired domain name and press the check availability button.
As you'll notice, you can also get other free domain extensions (.ml, .ga, .cf, .gq). I prefer .tk but you are free to choose whichever you like.
 I chose hosting-tut.tk
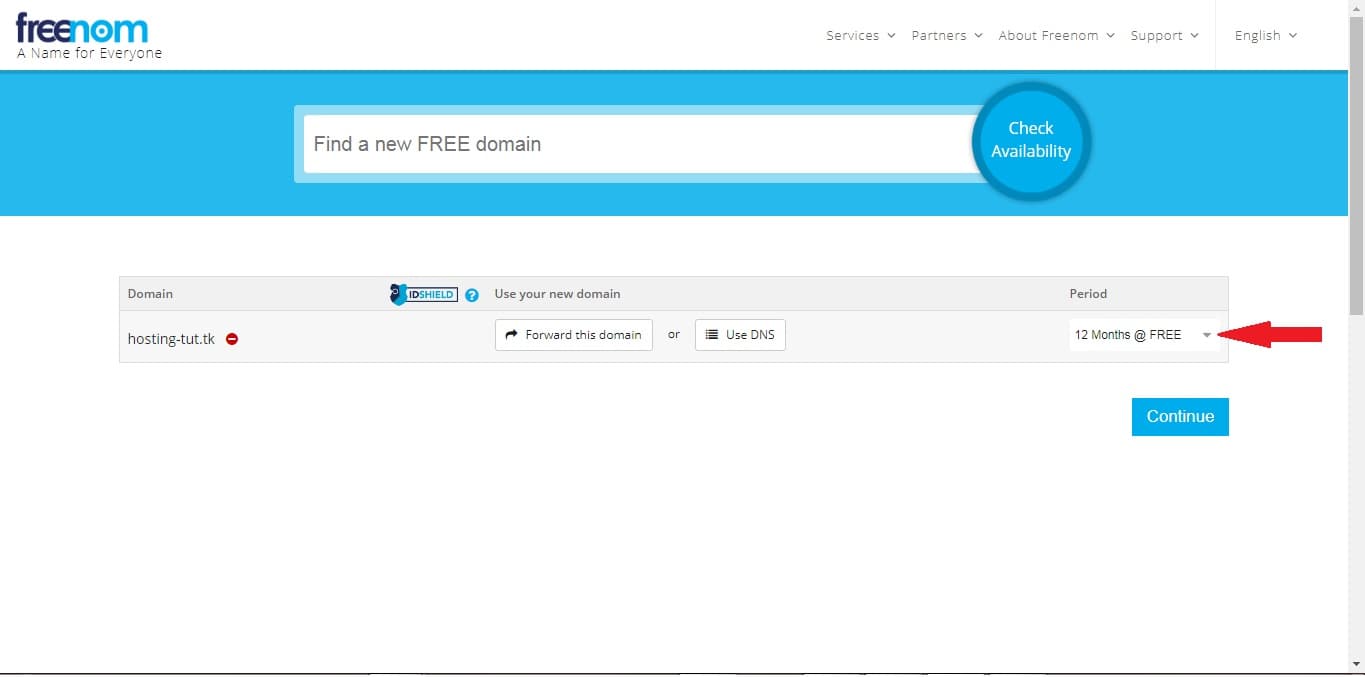
Press the checkout button, which should take you to the Freenom shopping cart, with the domain that you selected ready for 'purchase'.
Ensure that you set the period to '12 Months @ Free' on the right side as shown.

Don't touch the DNS Settings on this page, we'll change those later. Press continue to proceed with checkout.
On the next page, enter your email address, then confirm it and create your account.
Once your order is finalized, you should get an email from Freenom with the details.
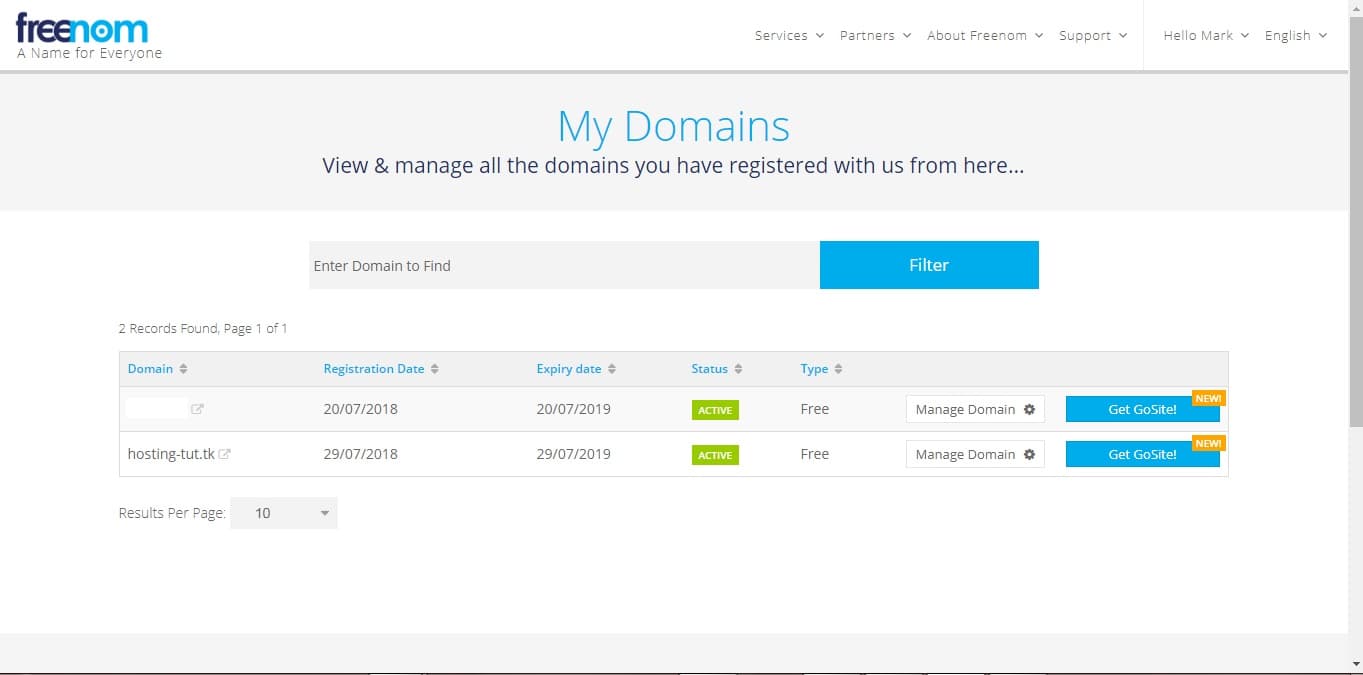
And if you log into your account and go to 'My Domains' (which can be found on the footer area), you'll see your domain listed here.

Getting Free Web Hosting
Now before I show you how to set up free hosting, I must say that it comes at a price.
Ironic, right?
But no, I don't mean a price in terms of money.
With hosting, you want to make sure that you have at least a 99% uptime guarantee, Fort-Knox kind of security, and most importantly, priority support. Because let's face it, you're gonna mess up at some point in time and shut down your entire site without a clue how to undo what you've done, in which case live support comes in handy (trust me, I've been there.)
A free hosting provider, more often than not, will not offer these things. Have that at the back of your mind.
Buut, since this is meant to host your project for demonstration purposes and not for production, we can overlook this fact.
If your goals are different and you want a more reliable host for your project/site, then I highly recommend that you check out Bluehost, who I have been using for the past two years now and can't recommend them enough.
Else if (haha, get it?) you just want a host for demonstration (or learning), read on.
000Webhost
000Webhost is the real deal when it comes to free hosting. For a free hosting provider, I'd say they are doing quite well.
To get started with them, head on over to 000Webhost.com and create an account.
You'll be asked to enter your website name. Give it a name, and a secure password. Once that is set up, and you have confirmed your email, you should be able to go to your-website-name.000webhostapp.com and view the site.
As you might have already guessed, all you'll see is a generic webpage created by 000Webhost. We'll change that in a bit.
You now have a site up and running!
Connecting the Domain to the Host
Now that we have secured our server space and have a free site running, we need to connect the domain such that when one goes to your-domain.tk, they'll see what is found in your-website-name.000webhostapp.com.
Doing this is easy, and it involves telling the domain registrar that hey, I have a host, and this is their address, point to them, then informing the host that you have pointed a domain to them, and that they should render your site if someone comes knocking.
Setting Custom Nameservers
To point your domain to 000Webhost, you need to use custom nameservers.
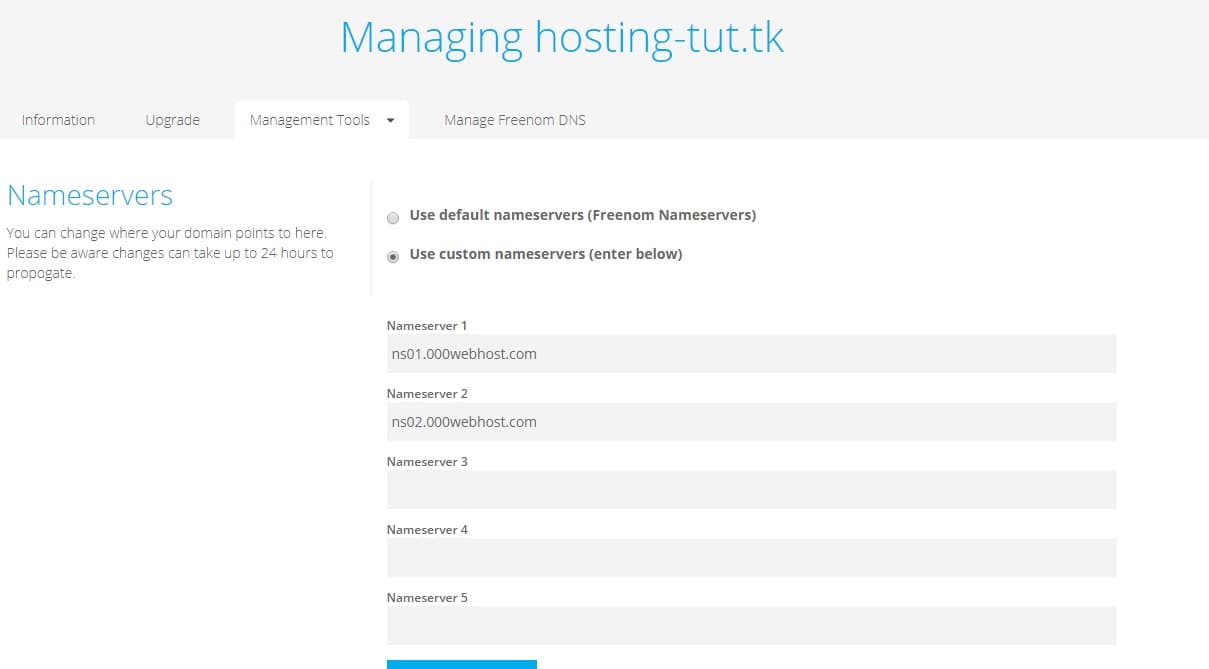
Log into your Freenom account and on the domains page, click on Manage. On the next page, click Management Tools and on the dropdown that appears, select Nameservers.
The default option is 'Use default nameservers (Freenom Nameservers)', but we want to change that so that we can point to our new host.
Select the second option 'Use custom nameservers (enter below)' and enter the following nameservers separately: ns01.000webhost.com and ns02.000webhost.com. Ensure that those are the only nameservers specified, otherwise there'll be a collision.

Click the Change Nameservers button and that's it.
Adding Custom Domain in 000Webhost
The next step is to inform our host of our domain, and what to do with it.
Log into your 000Webhost account if you aren't already. At the top, click on the Set Web Address option, then select Add Domain.
Select Parked Domain in the popup that appears, and enter your Freenom domain (your-domain.tk), and select Park Domain.
Your domain should now be added to the list of domains, with a status of Waiting for Nameservers.
Normally, it should take about 24hrs for the domain to go live, so don't follow these steps the day of presentation expecting to use it lol.
Adding Site Content
Once the Nameservers have propagated, if you go to your-domain.tk, you should see the same page as you did earlier when you opened your-website.000webhostapp.com.
So now all we need is to add our files.
Ideally, if you are hosting a full-fledged system, you'll need to set up the database as well, but that is beyond the scope of this tutorial.
Adding Files Through File Manager
At the top of your c-panel, click on the File Manager option. On the next page, click the Upload Files button, which should redirect you to a page containing the directory for your website. Open the public_html folder, and inside it should be a .htaccess file.
Click the cloud icon at the top right of the page to add more files. This gives you an option to select files to upload, which you should do.
If among the files you have uploaded there exists an index file (which there should), going to your address should render that index file.
Voila.
Adding Files Through FileZilla
The second option when it comes to uploading files to a remote server is through an FTP client.
There are many FTP Clients out there, but I use and recommend FileZilla. It is completely free to use, and quite efficient.
Download it and follow the normal installation procedure on your system.
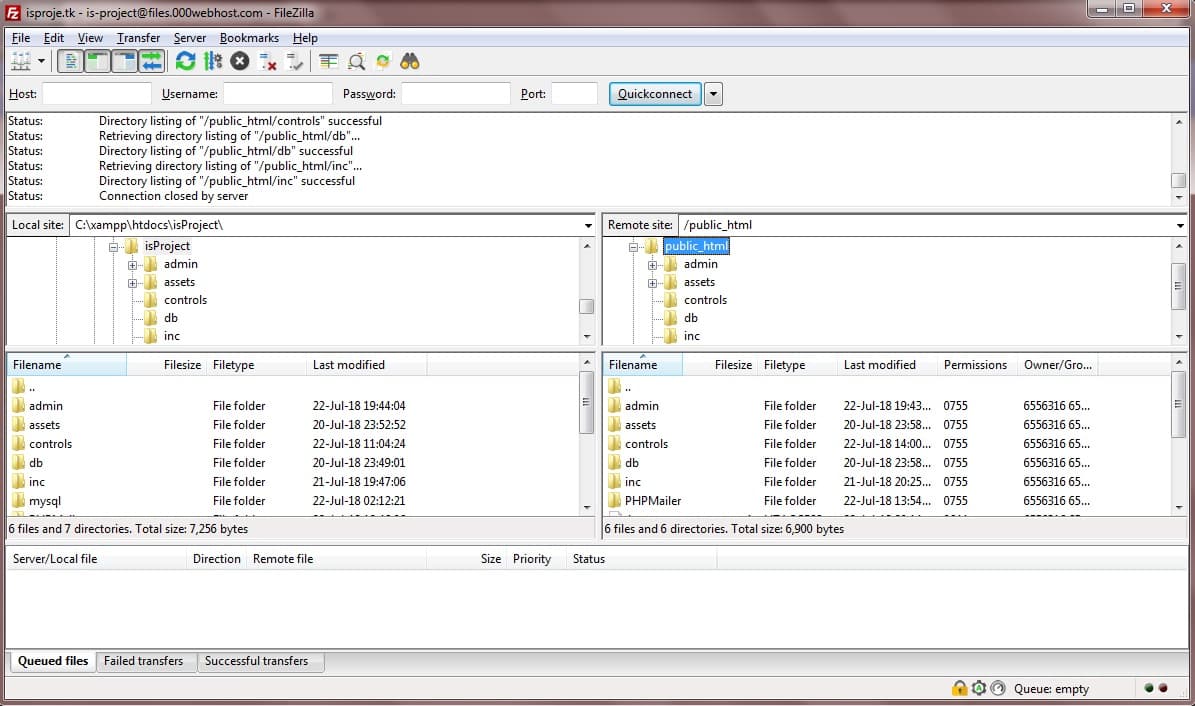
Once that's done, open it, click on File > Site Manager (or Ctrl + S if you like shortcuts). Create a new site (give it any name, preferably one that easily identifies it) and enter the FTP Credentials for your 000Webhost hosted site. These can be found by going to the Website List on your 000Webhost cpanel, and selecting Details on your site.
The host will be files.000webhost.com, so you just need your username and password. For the Logon Type in FileZilla, use either Ask for Password or Account. Then click Connect.
If you had uploaded any files earlier through the file manager, they should appear on the right side of the FileZilla dashboard.
So now with FileZilla, you can work with a local site (left side) and upon changes, just upload the files by double clicking on them (or entire folders by right clicking and selecting Upload).

Bonus
Everything's looking good now.
Or... Is it?
The 000Webhost-hosted site contains branding on the bottom right of the screen, and honestly, that sucks.
I know we're using a free service and the least we can do is allow them some marketing space on our site, but you'll probably not want to have that on your presentation day.
However, the branding is not on your site documents, you did not add it.
So, how do you remove it?
Through CSS. Or Javascript. But I'll go the CSS way because it is pretty easy.
On your main stylesheet (one that appears all over your site), add the following:
img[src="https://cdn.rawgit.com/000webhost/logo/e9bd13f7/footer-powered-by-000webhost-white2.png"]
{
  display: none;
}
In case it doesn't work, that means that the source for the image on your site is different from the one I've used, so just use Inspect (Ctrl + Shift + I on Chrome on Windows) to get it's source and replace the one above.
Problem solved.
Wrapping Up
So now, you don't have to carry your laptop with you during the presentation day. Just finish up with your project, upload it to your new site, and access it from anywhere.
What's better, you can now ask for feedback from anyone, anywhere in the world on your project, without the back and forth of sending site files from one person to the other.
And you don't have to pay anything for it. (not in cash anyway)
Pretty awesome right?
You know what, if you do go ahead and set up hosting using this guide for your project (or for any other reason, such as a WordPress site), I'd like to have a look at it.
Feel free to shoot me a tweet @muthiimm. You could also send me an email. Can't wait to hear from you.
A couple of things to remember:
- If you prefer using a different TLD other than .tk (or any of the free ones), such as .com, .net or .org, you can get one at a very cheap price from Namecheap.
- 000Webhost, despite being a good provider, has some issues (for instance, my cpanel went dead as I was writing this and hence the reason there are no screenshots for the cpanel lol), issues which are expected. If you'd rather spend a couple dollars and get stellar hosting services (plus a free domain I might add. Yeah, a .com, .org; whichever you want), then I highly recommend Bluehost. I use them for all my client projects, and some of my sites, and have nothing but positive feedback. Give them a shot.
Alright, that's it for today.
Till next time, stay awesome and code on!