Hacking From the Cloud, Part 1
Setting up Kali Linux on Amazon Web Services
Some time back, I got access to one of my good friend's gmail account.
I received death threats once she found out. Good thing she hasn't seen them through.
She asked me to prove to her that I had really hacked into her email account as I claimed, by hacking into her Instagram account (that's consent right there, so hold your horses lawyers).
I've been learning Kali for some time now - trying to understand the different tools and what they are capable of - but never really got to the point of installing and running it. Yes, tutorial purgatory is real.
But after the challenge, boom came the motivation to make the shift from Windows.
I however have some unfinished business with windows, and hence couldn't make the shift quite yet. My computer can also not run a VM (thanks limited resources for that), so I had to figure something out.
Early this year, (or late last year I'm not sure), I had tried to set up a self-hosted email marketing software on Amazon Web Services (AWS), which required an Ubuntu instance. And while running the software had been unsuccessful, the Ubuntu instance was working perfectly.
So it didn't take me long to think of setting up a Kali Linux instance on AWS as it would involve more or less the same steps that the Ubuntu instance had. Meaning, I could run the hack, without requiring a Kali installation on my local machine to replace my windows installation.
Plus, it is free. And we all love free stuff.
So I set up a Kali Linux instance on the cloud, and I'm now documenting how I did it.
If you do not know what Kali Linux is, I suggest you end your reading here. Grab a frisbee and go play catch with your dog in the park.
No seriously, this one is not for you. First learn about Kali here.
Create an AWS Account
As with almost everything you do in the internet nowdays, you first need to create an account.
Amazon will need to verify your account, and you will have to provide billing details to start their free-tier year. You will not be charged for anything if you do not exceed their limits (which is highly unlikely)
More details on getting set up with their free-tier offer can be found on the AWS homepage
Launch A Kali Instance
Once your account is verified, click on the AWS Management Console drop-down link under the My Account menu link.
 AWS Management Console
Find the Launch a virtual machine option (with EC2), which can be found under build a solution and click on it.
According to this page, Amazon Elastic Compute Cloud (Amazon EC2) is a web service that provides secure, resizable compute capacity in the cloud.
We will use it to launch our Kali instance.
The next screen after clicking the Launch a virtual machine option leads you to a screen with 7 options, the first being to choose an Amazon Machine Image (AMI).
Choosing an Amazon Machine Image for Kali Linux
Click the AWS Marketplace tab, search for Kali Linux, and click select.
 Selecting Kali AMI
A pop-up will appear with pricing details, but worry about it not, for Kali Linux is free-tier eligible and you will not be charged so long as you maintain within the limits (750 hours per month of runtime).
Click continue on that popup.
Choosing Instance Type
Unless you are willing to pay for a different package, then you only have one option here, the t2.micro instance type. Make sure it is selected.
 Selecting Instance Type
Configuring Security Groups
At this point, your Kali Linux instance is ready and can be launched.
However, since we will need to connect to the virtual machine in order to use it, we need configure the security group attached to that instance.
This is especially important for connecting through SSH.
Click through the next button until you get to the 6th tab, Configure Security Group. You can leave everything else up to that point in its default settings.
I am assuming this is your first install of an instance on AWS, so select the Create a new security group option.
Give the group a name, or leave the default name.
Next, make sure in the first rule, the type selected is SSH, and change the source from Custom/Anywhere to My IP. This will ensure that only your current computer has SSH access to the Kali instance.
 Configuring Security Group
Once this is done, click on the review button.
Generate Key Pairs
If all the details displayed about the instance are as you remember defining them, and especially so the security group rules, click on launch.
This should display the pop-up shown below.
 Generating a Key Pair
Select the generate a new key pair option and give the key pair a name. It can be anything, just make sure you can easily associate it with the instance you are just about to launch.
As it is stated in the pop-up, this key pair will be useful in connecting to your instance and the private key should be downloaded and kept in a secure place within your computer, in a path where you can easily navigate. I store mine in a directory within the C drive.
Once you have given the key pair a name, click download to save the private key. Then, launch the instance.
Et voila. You just launched a Kali Linux instance on the cloud. Time to get Mr. Robot-y!
Connecting to the Kali Instance through SSH
Our machine is now live. What's left is to connect to it, and start hacking away.
We need to do two things. Three, actually.
In the page that opened after launching the instance earlier, click on View Instance. This should direct you to the EC2 Dashboard.
Select your Kali instance and take note of the public DNS address record. Write it somewhere, or commit it to memory as you'll need it every time you need to make a connection to your cloud instance.
Scroll horizontally to the last column in the table, the security groups column. Click on the security group name you configured ealier.
On the next page, click the inbound option, then edit. Just as we had done earlier, select My Ip in the source column.
Now on to our local machines.
For this step, you need some knowledge of the terminal, or CMD if you are on windows.
Fire up your terminal and check if you have an ssh client installed.
sshIf the command is not recognized, then you need to install an ssh client. To be honest, I'm not sure at what point my ssh client got added into my windows system, whether it was when I installed git or maybe when I installed Putty. It works and most times, that's all you need to know.
If your ssh commands is unrecognized, trying installing one after the other, and see which introduces the ssh command (my money is on putty).
Once that is done, navigate to the location you downloaded the .pem private key file ealier.
cd /path/to/private/key/fileWhile here, you need to change the mode of the file, so that it is not publicly viewable. Use this command, and remember to replace the KEY-FILE.pem with the name of your private key.
chmod 400 KEY-FILE.pemNow it's time to create the connection through ssh
ssh -i KEY-FILE.pem ec2-user@PUBLIC-DNS.compute.amazonaws.comReplace PUBLIC-DNS.compute.amazonaws.com with your public DNS, which we wrote down earlier.
At this point, you should have an established connection to your AWS hosted Kali Linux instance.
 Connection to Kali Linux AWS Instance Established
And what better way to test the Kali Linux install than through running one of the most popular Kali frameworks, Metasploit!
msfconsole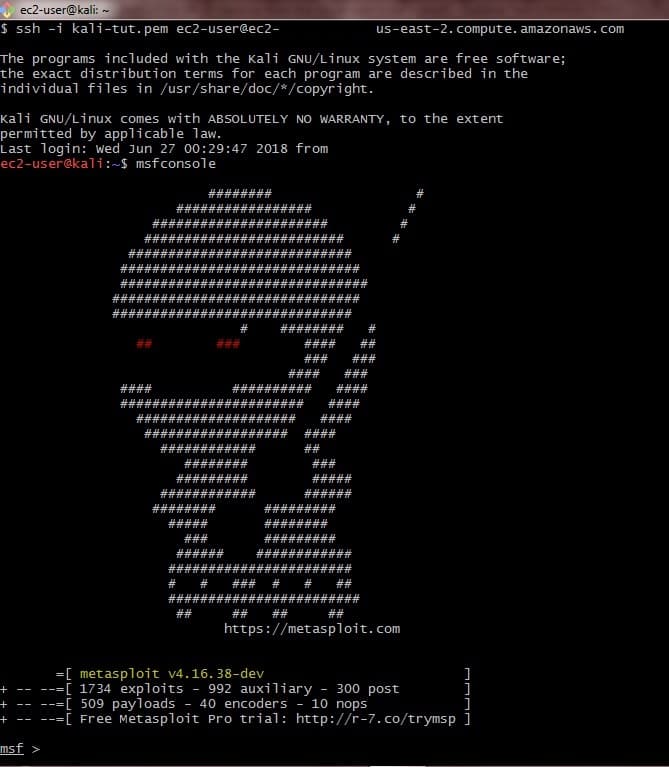
Wrapping Up
So that, is how you start your path to hacking on the cloud. In the next part of this series, I will tackle a couple of scripts and tools that you can run on Kali to hack your way through the internet.
I'm pretty sure there are other alternatives out there that offer free Kali installs on the cloud, and I would love to hear from you if you know of any.
Shoot me a tweet @muthiimm, or send me an email
Will I publicly state whether or not I was able to hack her (remember my wishing-death-on-me friend?) Instagram? I dunno. Probably.
If you would like to know the minute I release part 2 of this series (keeping a blogging schedule is difficult folks), then head on over to the home page, and tap that 'Never Miss a Post' button.
You'll be subscribed to my no-spam, no-bs email list and get valuable stuff delivered straight to your inbox, every week. And need I add that, it is free.
Alright, till next time, stay awesome and hack on!